Peel-and-stick tile is all over social media. But is it that easy?
Writer consults the experts and takes on the project.

If you’ve found yourself on the DIY home improvement side of TikTok, you’ve probably seen influencers touting peel-and-stick tiles as an easy, inexpensive, renter-friendly way to spruce up floors, backsplashes, accent walls, and even showers — no contractor required. But is it really that simple? I decided to find out.
The shower in my guest bathroom made the perfect target: The tile wasn’t to my taste, but the bathroom is rarely used, so I didn’t want to spend a lot of money upgrading it. Before embarking on my peel-and-stick mission, I spoke with experts to get their best advice. Here’s their guidance, coupled with my own experience.
Select the right tile
Choosing a peel-and-stick tile for a spot such as a backsplash or accent wall, which probably won’t get too wet or hot, is relatively straightforward. But for a project like mine, I learned you have to be more discerning.
“You have to find a product that you trust,” said Stephanie Bloom, who’s amassed more than 23 million likes for her DIY renovations on TikTok. “There’s tons of products. You can go on Amazon and it’s going to pull up 300 different peel-and-stick tile options, so you have to look at the description of each tile and make sure it’s truly waterproof.” Look for a product whose description clearly states that it can be used in the shower, she said.
Bloom also suggested that I might instead use tile decals for my project. Made of vinyl, these lay directly over existing tiles and don’t require mapping out a new tile pattern or grouting edges. I unfortunately wasn’t able to find any that matched the shape and size of my existing tile, but I would try this option for a future project. (This method will not work if you’re dealing with a fiberglass shower or another flat surface.)
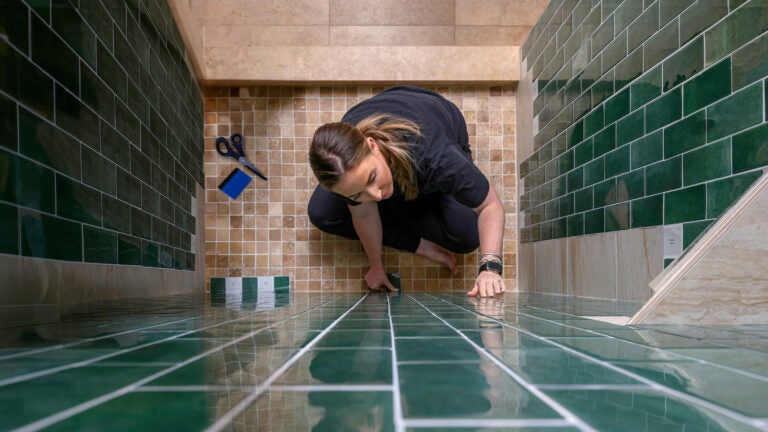
Ultimately, I selected a traditional peel-and-stick tile with fake grouted lines by Artemuro in a bright-green color with a subway shape. If I were to go back and do it again, I would opt for square tile, which I believe would have been easier to place. The intricacies of the subway pattern became one of the most challenging aspects of my install.
Prep your surface
One of the most important parts of the process is also the simplest — cleaning your surface so the tile’s adhesive will stick firmly to the wall.
“Even the slightest amount of dust can lead to peel-and-stick not sticking as well,” Bloom said.
To prepare my shower, I used an all-purpose cleaner with a paper towel to wipe down the entire area set to be tiled. I purposely avoided using a cleaning cloth that could leave behind fibers.
Begin tile placement
There are two schools of thought about how to place peel-and-stick tile in a shower.
Cameron Johnson, CEO of Nickson Living, an interior design company that specializes in rentals and frequently uses peel-and-stick tile, advises starting in the middle of each wall and working outward. Bloom recommends starting on the far-left-hand side and working to the right.
After handling an installation myself, I can see the benefits of both options. I decided to follow Johnson’s advice and start in the middle of my wall to create a more symmetrical pattern on both sides, but this necessitated more cuts. Starting flush against a clean edge on the left side would have required only cutting the tiles one time, when I reached the end of the wall on the far right.
Johnson also recommended using a template to plan where each tile will go. “For a novice, you might want to use chalk or painter’s tape to map out your layout,” he says. “You can make yourself a map so that you know you can live with the layout before you actually put the peel-and-stick tiles up.”
I can confirm that I wish I had done this. I didn’t think it would be worth the added time, and that was a mistake. My first error was lining up my two center sheets of subway tile — not staggering them — so I ended up with a perfectly stacked pattern, instead of the usual staggered design, right in the middle of the back wall. I also had issues with uneven spacing the rest of the way.
Luckily, I’d gotten some invaluable advice from Trina Sholin, a renovation expert who specializes in RVs (which, she says, are great candidates for peel-and-stick makeovers since the material is lighter weight than real tile). She encouraged me to lightly attach the peel-and-stick sheets before fully setting them, which allowed me to make adjustments as I worked.
“You can typically take the tile off and put it back on about three times, so what I do is put it up there just lightly at first — maybe just tap your four corners to see if you like it — stand back and see if you really like it, then really press it on there,” Sholin said.
Cut tiles to fit in corners and around fixtures
I found cutting the peel-and-stick tile to fit the edges of my shower and around the faucet and showerhead to be the most difficult part of the installation by far.
Bloom supplied one piece of advice that helped: Using a pencil, trace around hardware onto the tile’s paper backing to create a template. From there, I would cut my template, check it against the shower, tape it to the peel-and-stick tile sheet, and cut around it. Note: Even with a decent blade from my peel-and-stick tile kit, cutting through the thick plastic was tough.
This strategy worked pretty well for the edges of my shower, but the tile I was cutting to fit around my faucet and showerhead still looked off. About halfway through the process, I bought a contour gauge for tracing circular pieces that made the process infinitely easier.
Make sure the tile sticks on securely
Once your pattern is placed, it’s important to press down the tiles firmly enough to ensure they’ll stay put, and to get rid of air bubbles.
“You might want to use a rolling pin to get the air bubbles out and make the tile nice and straight on the wall,” Johnson said. “They have these things called floor rollers, too, but it’s basically just like a rolling pin that allows you to apply pressure to get the tile as flat as possible.”
I primarily used a smoother that came in a peel-and-stick kit that I bought for this project, but a rolling pin probably would’ve worked just as well.
Finish the project with a professional touch
Each of the experts I talked to recommended using caulk or PVC quarter-round to seal the project, clean up imperfect edges, and give the tile a more professional look.
“The edges may not align perfectly, so you’ll likely want to use some caulk along the corners,” Johnson said. “It will also make the tile look finished and more like regular porcelain tile.”
Rather than traditional caulk, I decided to keep with the peel-and-stick approach and use InstaTrim self-adhesive caulk tape. While it looked nice at first, within a day, it shrank in length and started peeling off. I had better luck with a flat adhesive trim, which helped to disguise my imperfect cuts and matched the color of the peel-and-stick tile’s grout lines.
Final verdict
With tile, trim, a smoothing tool, and the contour gauge, this project ended up costing just under $500, even after selecting a less expensive peel-and-stick option. And it wasn’t quick: All told, I spent about 10 days on it. Add in the beginner mistakes and general difficulty of the project, and I can’t say this DIY was worth the trouble.
However, I do love that I was able to experiment with a fun tile color I might not have chosen for a more permanent change. I’ve taken it for a test run, and the tile has held up under the water and heat. Plus, every time I look at it, the mistakes seem more minor.


Conversation
This discussion has ended. Please join elsewhere on Boston.com